How to fix a Full brick?!?!?!
Posted by Namuv
|
How to fix a Full brick?!?!?! March 14, 2011 06:55PM | Registered: 14 years ago Posts: 2 |
|
Re: How to fix a Full brick?!?!?! March 14, 2011 11:53PM | Registered: 15 years ago Posts: 252 |
First you need one of two things
-an old wii compatible with boo2 bootmii install
Or
-a newer wii that does not support boot2 bootmii install, but has the NAND keys, from a bootmii NAND backup, xyzz (something like that) or orbs method of getting the keys. If you have the keys you can program the NAND
Without a boot2 bootmii compatible wii or the NAND keys, you can't program the NAND. There are two really good guides on this, but they can't be linked here.
In my opinion, this would be hard for me to do. I personally would pay someone to do it.
Deadlyfoez, Bad-Ad84, streamlinehd,- these guys can do it for you, if you have the keys or an old wii.
|
Re: How to fix a Full brick?!?!?! March 19, 2011 03:45PM | Registered: 14 years ago Posts: 2 |
|
Re: How to fix a Full brick?!?!?! March 19, 2011 07:30PM | Registered: 15 years ago Posts: 252 |
Quote
streamlinehd
WARNING: This Is An Advanced Guide.... If you don't understand everything here, I recommend you do not proceed as this is advanced brick repair and is not a suitable option for most bricks. Please consider ALL other options before continuing with this method.
Chapter 1 - What You Should Know Before You Start
Nand flashing isn’t for everyone and there are many factors you should consider before attempting to follow this guide. First and foremost, you must have excellent mechanical and problem solving skills. If you’ve never done any type of electronics repair work before, this is not a good place to start. Secondly, doing this for the repair of a single console isn’t at all practical. The costs involved in acquiring the required tools and equipment to successfully complete this task can easily exceed the cost of a brand new console. Lastly, you should consider the fact that the vast majority of people who attempt to flash their Wii fail. This is my one and only warning and I strongly suggest you read this guide thoroughly and think this all over before continuing.
I’m writing this guide with hopes of helping more people to succeed as a lot of the fail has to do with the information available. Some guides on this topic are even setup for failure however most people place self blame and wind up giving up. As mentioned in the warning above, this is advanced brick repair and I've done my best to keep the process as simple as possible in this step by step tutorial. If you have a question not covered or get stuck on a step, post your question or issue in this guide. Please do not open separate threads or PM me as this won't help other members having a similar problem.
[SPOILER="FAQ"]Q: Who should follow this guide?
A: This guide can be used to repair all software related bricks however it's strongly suggested that you only attempt this as a last resort to repair your Wii. If your Wii is bricked, you should post a thread in the bricked section[ of the site before continuing with this tutorial. Most bricks can be repaired by using other methods and either myself or others can tell you what those options are.
Q: What types of bricks are commonly repaired using this method?
A: Full bricks without boot2 Bootmii, Low-Level Bricks, and in certain circumstances Semi-Bricks. (If Bootmii, Priiloader, Homebrew Channel and game exploits are inaccessible). [/SPOILER]
What you need to know About Boot1 and Boot2 before you start[*]Boot1a, boot1b = Boot2 Bootmii Compatible (Bootmii ARM can be injected into boot2)
[*]Boot1c, boot1d = Not Boot2 Bootmii Compatible (You will need a NAND backup or keys that was created with Bootmii).
[*]Boot2 can not be downgraded but can be updated.
If your Wii is boot2 Bootmii compatible[*]You will need the boot blocks from a donor NAND with the Bootmii ARM code injected into boot2. If you don't have a donor you can use my Boot Patcher program to generate the boot blocks.
[*]If you aren't sure if your Wii is boot2 compatible you can check your serial number here
If your Wii is not boot2 Bootmii compatible you will need:[*](a.) working nand backup from the bricked Wii
[*](b.) donor nand backup from another Wii and the keys from your bricked Wii.
NOTE: If you don’t know what version of Boot1 is installed on your Wii you can try using WiiNand v0.2 to detect your boot1 version. For some reason WiiNand can’t always detect the boot1 version and unfortunately there’s no other program that will do this ATM. EDIT: New WiiFlash Toolz v0.0.0.1 will detect all boot1 and boot2 versions. If you know how to use a hex editor you can also compare the boot1 blocks from a known nand to figure out what boot version you have.
Chapter 2 - Getting Started NAND Flashing Tutorial
Step 1 – Acquiring the required tools/software
You will quickly find that this type of work is a dying trade and gathering all the required tools and equipment is not such an easy task. Here’s a complete list of the tools/equipment and software you will need before you continue. I recommend downloading all the software and putting it in an easily accessible folder on your computer.
[SPOILER="Password for Downloads"] The password for all downloads is:[/SPOILER]
1. Infectus Programmer Software v3.9.9.0
2. Xavbox Software v1.0.0.7
3. Libusb devel filter 1.2.2.0
4. Hex Editor (I use Hex editor Neo)
5. WiiFlash Toolz v0.2
[SPOILER="Tools & Equipment"]1. Infectus or Infectus2 Modchip
2. TSOP48 Programmer Adapter
3. Hot Air SMD Rework Station
4. Multimeter with Continuity Testing
5. 30-AWG wire or serial cable wire will work as well
6. Good Soldering Iron (with temperature selection dial recommended)
7. Fine Point Soldering Tip (0.5MM)
8. Bevel or Hoof Soldering Tip (Small 3.3MM)
9. No Clean Liquid Flux (Kester 951)
10. Eye Dropper
11. Phillips Precision Screwdriver
12. Small Tri-wing Screwdriver
13. Fiberglass Pen
14. Desoldering Braid (Wick)
15. Magnifying Glass
16. Ultra Fine Solder (.010 diameter)
17. Tweezers
18. isopropyl alcohol
19. Bricked Wii[/SPOILER]
Step 2 – Putting Infectus Into NAND Programming Mode
Note: When you first connect Infectus to your computer and open the Infectus Programmer Software you may be asked to perform an update. You should accept this update and wait for it to complete as you won't be able to continue until you do. Don't worry if you don't receive a message saying the update is complete because the update will start over again if it doesn't complete properly.
1. Download and extract the Infectus Programmer Software v3.9.9.0 to a convenient location on your computer.
2. Connect the Infectus to the USB programmer and plug it into your computer. The new device detection wizard should open. Choose to browse for device software and install the Infectus drivers manually from the folder you extracted them to (e.g. C:\InfectusProgrammer-3.9.9.0\USB-Drivers3.1).
3. Open the Infectus Programmer software and you should see a message at the bottom which says Board: Infectus 1/2. Select the menu option Actel Firmware and select NAND programmer. Then select program located at the bottom of the same drop down menu.
4. The software will begin programming the Infectus into NAND programming mode. Wait for this process to complete and then close the Infectus software.
Step 3 – Remove Infectus Drivers and Install Xavbox
1. Download and extract the Xavbox Software v1.0.0.7 to a convenient location on your computer.
2. Launch the Setup Wizard and follow instruction to install Xavbox to your computer.
3. Remove the Infectus drivers by locating your device manager, right clicking on Infectus device and choosing uninstall (see image below). A dialog box will appear to confirm you want to delete the software, select the box that says delete the driver software for this device and click OK.
4. Unplug the Infectus from your computer and plug it back in. Go back to Device Manager, locate USB API, right click on it and choose update driver software. Choose to brows your computer for the drivers and navigate to the location you extracted them to (e.g. C:\Xavbox_v1.0.0.7\Drivers).
5. Download LibUSB-Win32 Setup Wizard and install the software. When the software finishes installing, choose to launch the filter installer wizard and click finish.
6. Choose to install a device filter and click next. Locate USB Composite Device with pid: 4f11, if you see multiple devices with the same ID, look for the one that says Standard USB Host Controller select it and click Install.
7. Xavbox is now ready to work properly with your Infectus device.
Step 4 – Connecting Infectus to Your NAND
There are three methods to connecting the Infectus to your NAND. These methods include; (1) on-board programming by soldering to the legs of the NAND, (2) on-board programming by soldering to the vais of the motherboard and (3) external programming via TSOP adapter. I recommend removing the NAND from the motherboard and programming it externally with a TSOP Adapter. I’ve personally found this the best way to program since it’s a direct connection to the NAND which means the chances for data corruption are lessened. The other two methods are on board programming methods which requires pin-point soldering skills or making 18 very frustrating connections to the vias of the motherboard. I don't recommend using the on-board methods because they require above average soldering skills and you are much more likely to have data corruption using these methods. That being said, this guide will focus on the external programming method via TSOP adapter.
External Programming via TSOP48 Adapter
In order to connect Infectus to your NAND externally you will need to solder 19 wires from the Infectus to your TSOP48 adapter. This requires moderate soldering skills and the use of a continuity meter in order to ring out each pin of the adapter to the correct soldering points. Use the wiring diagrams below for reference.
NOTE: You will have to carefully remove your NAND from the motherboard using a Hot Air Rework station to complete this method. To do this properly, I recommend applying a few drops of no clean flux and heating each side of the NAND for about 30-45 seconds while lightly prying the chip away from the motherboard. You should use the temperature and fan speed settings that best suit your Hot Air station for proper SMD removal.
[SPOILER="Programming The NAND Externally Wiring Diagrams (Recommended Method)"]
Big Thanks to Krafter for the above diagram!
Your end result should look something like this (I know it ain't pretty but it works :)).[/SPOILER]
[SPOILER="Programming The NAND On-Board Wiring Diagrams (Not Recommended)"][SPOILER="Connecting Infectus to NAND On-Board Method #1 (Not Recommended)"]
Note: If you are programming on board you will have to short the data 0 wire from the nand to ground for a second upon powering up the Wii. After the short is made you can reconnect the data wire back to the Infectus and begin programming.[/SPOILER]
[SPOILER="Connecting Infectus to Vais On-Board Method #2 (Not Recommended)"]
Note: If you are programming on board you will have to short the data 0 wire from the nand to ground for a second upon powering up the Wii. After the short is made you can reconnect the data wire back to the Infectus and begin programming.
[/SPOILER][/SPOILER]
Step 5 – Testing Read/Write Capabilities
1. With Infectus connected to your computer open up Xavbox and choose Detect USB, then select Open. Your screen should look like this:
2. Press Ident and the Blocs, Pages, Bytes and Spare boxes will automatically populate with the correct information. Your screen should now look like this: (If you receive any errors at this point see troubleshooting)
3. If you haven't received any errors to this point, congratulations you made all your connections properly and Xavbox is ready to read your NAND. Now press Destination and set a destination path for your first read/write test and name the file flash.bin (e.g. C:\User\desktop\flash.bin)
4. Set the parameters to start at block 4080 and end at block 4095 and then press read. This will read blocks 4080-4095 of the NAND and write them to the file specified.
5. Write blocks 4080-4095 back to the NAND by putting the file you just made (flash.bin) in the Source box and setting the parmaters to start at block 4080 and end at 4095. Also select the relative offset checkbox.
6. Now choose the Update and Compare write option and press Write. If all the blocks write to the NAND successfully without a compare error, you are good to go and this test was successful. If you do have a compare error and the write fails, see the troubleshooting section of this guide and do not continue!!.
IMPORTANT: A different block message (e.g. block 1 different) in the results window is not a compare error. A compare error will end the writing process at the block that didn't write/compare properly.
Step 6 – Flashing The NAND
A.) Flashing Boot2 With Bootmii ARM
1. First make a full dump of the NAND by selecting a destination path and setting the parameters to start at block 0 and end at block 4095. Choose to read those blocks and wait for this step to complete. Please note that this process will take a while to finish.
2. Make a copy of the full NAND dump and put the original file in a folder not to be touched unless needed. This will serve as a backup just in case you make any mistakes when writing to the NAND.
3. Determine Which version of Boot1 is on the NAND by opening the copy of your full dump with WiiFlash Toolz. You can also open the dump with a hex editor and check the value of offset 40 to determine the boot1 version: (see picture below)
@ Offset 40 a value of 99 = Boot1a, c1 = boot1b, fc= boot1c, and 48 = boot1d
The example below shows that the NAND has boot1b installed.
4. Get a donor NAND dump with Bootmii injected into boot2 and use WiiFlash Toolz to extract the boot blocks. Keep in mind that the boot1 version from the donor NAND must match the boot1 version of the target NAND and boot2 can match the target NAND or can be upgraded to boot2v4.
5. In Xavbox load the boot blocks you just generated with WiiFlash Toolz to the source input and then set the parameters to start at block 0 and end at block 7.
6. Choose Update and Compare and then press the Write button. This will update/compare the boot blocks and inject Bootmii into boot2 (If you receive a compare error see the troubleshooting section of this guide).
7. The NAND now has Bootmii flashed into boot2 and is ready to refit to the motherboard.
B.) Flashing Backup NAND - Non-boot2 Compatible Consoles
1. In Xavbox load your Bootmii backup (nand.bin) to the source input and then set the parameters to start at block 0 and end at block 4095.
2. Choose Update and Compare and then press the Write button. This will update/compare any different blocks on the NAND with the data from your backup. This process can take a quite a while to complete (If you receive a compare error see the troubleshooting section of this guide).
3. The NAND has now been flashed with your working backup and is ready to refit to the motherboard.
C.) Flashing Donor NAND - Must have keys from bricked Wii
1. Follow the Betwiin Guide to encrypt the donor NAND with the bricked Wii's Keys and then continue to follow this guide. If you have a question on how to use Betwiin, please post in the guide and do not post those questions here.
2. In Xavbox load your Bootmii backup (nand.bin) to the source input and then set the parameters to start at block 0 and end at block 4095.
3. Choose Update and Compare and then press the Write button. This will update/compare any different blocks on the NAND with the data from your backup. This process can take a quite a while to complete (If you receive a compare error see the troubleshooting section of this guide).
4. The NAND has now been flashed with your working backup and is ready to refit to the motherboard.
Step 7 – Refitting NAND To Motherboard
1. Clean the NAND solder pads on the motherboard with de-soldering braid (wick) so that you have a clean and smooth surface to solder to.
2. Follow this video tutorial to refit the NAND to the motherboard.
[video=youtube;YzI31gfCjJE]http://www.youtube.com/watch?v=YzI31gfCjJE[/video]
Troubleshooting
[SPOILER="Troubleshooting"] I get an error in Xavbox when I try to detect USB.
Solution: Check to make sure the Xavbox drivers and Libusb filters are installed properly.
I'm getting a GEM CHIP V10 - Error during infectus reset ! error in Xavbox
Solution: This means the programmer can't see the NAND chip and you should make sure it's seated in the TSOP Adapter properly. If the NAND is seated correctly, try removing it from the adapter and use a fiberglass pen to gently remove any solder or flux built up on the legs of the chip. If the problem still occurs, you will need to check your wiring.
Fabricant inconnu / Type inconnu ! error Please Help!
Solution #1: This error means the NAND is recognized by Infectus however it can't read it properly. Check to make sure the NAND is in the adapter properly, inserting the NAND backwards can cause this issue.
Solution #2: Try removing the NAND from the adapter and use a fiberglass pen to gently remove any solder or flux built up on the legs of the chip. If the problem still occurs, you will need to check your wiring.
The data being written to my NAND is all FB or FF when I look at each byte with a hex editor.
Solution: This is likely happening because you have an issue with your voltage or ground wires. Check to make sure these wires terminate from the Infectus to the TSOP adapter correctly. Also make sure the the legs of the NAND are clean and making a good connection. (note: built up flux on the legs of the nand can cause a bad connection.)
Xavbox all of a sudden stopped recognizing my programmer?
Solution: Shut down Xavbox and unplug Infectus from your computer. Then plug your Infectus back in and reopen Xavebox.
I flashed my NAND and refit the chip to the motherboard but I still get a black screen when I power on my console.
Solution: Connect your drive light to the motherboard and see if the light stays solid when powering on your Wii. If the drive light stays solid you need to make sure the NAND was refit properly. Make sure the NAND lines up with the solder pads and that you don't have any bridges. If the NAND was fit to the board properly and still doesn't work, you will need to remove the NAND and check your boot blocks (blocks 0-7).[/SPOILER]
[SPOILER="Credits"]Special thanks to:
Krafter for his NAND wiring diagram and all his extra help with editing this guide.
Bad_Ad84 for his expertise and miscellaneous help.
DeadlyFoez and evans112682 for providing the vias diagrams.
Team Twiizers and Bushing for making this all possible.[/SPOILER]


|
Re: How to fix a Full brick?!?!?! March 19, 2011 07:40PM | Registered: 15 years ago Posts: 252 |
Quote
deadlyfoez
ATTENTION: Please do not send me PM's unless you are looking to send me your wii for repair. I get way too many people PMing me on a daily basis for general help info when their questions would be better off in a thread for someone elses reference in the future. Thank you.[*]
[*]What this thread is not;
This is not to become a help thread. I dont want to answer a million questions from people who don't read and are unwilling to learn on their own. I will not get into teaching anyone how to hex edit the files. This type of stuff you can learn elsewhere.
If there is something that I have forgot to talk about then mention it to me and I will edit this first post to add that info in.
[*]Things Needed;[*]Infectus Modchip (An Infectus2 functions the exact same way, thus it works also. NOTE: These are no longer made and thus VERY hard to find.
[*]15 Watt soldering iron (40 watt is better)
[*]Flux, it is very helpful to have some.
[*]Multimeter with continuity testing
[*]Bricked Wii with either a vulnerable boot1, nand backup or the keys.
[*]IDE 80 wire solid core ribbon cable or 30 gauge Kynar Wire (other things may work)
[*]Xavbox Programmer 1.0.0.7 and it includes the most recent drivers.
[*]A donor nand dump that has bootmii installed as boot2, or a nand backup for your wii. (Dont ask me for a file as I am not allowed to share my files)
[*]Tweezers are very helpful
[*]A good eye or some type of magnification device is very helpful
[*]A brain
[*]Previous great soldering skills or good luck.
Let me get into a little technical stuff first. You should read this before you attempt anything. If you can not understand this stuff then forget about your wii and just send it to nintendo or call it a loss.
[*]How your wii works. This information is solely for what I have specifically asked TeamTwiizer members. Anyone feel free to correct me if I am wrong. I might not be %100 accurate about how it all works but the idea is correct;
When you turn on your wii the first thing that happens is there is code in boot0 which is stored in the Hollywood processor.
Boot0 does a hash type check on the boot1 code which is stored in the nand. If the hash does not match the the system halts. (so boot1 versions are incompatibly on wii's that have a different boot1)
Boot1 does a hash check on boot2. If that hash check passes the boot1 will execute boot2.
On older wii's, boot1 has the famous trucha bug in it so the contents of boot2 can be manipulated and boot1 does not correctly hash check boot2.
[*]Bootmii as boot2 and why it works;
When bootmii is installed into boot2 version 2 or version 3 (aka boot2v2 or boot2v3) it only writes to blocks 3 and 4. Block 4 contains a "magical" block map. This blockmap specifies which blocks are bad. Normally blocks 3 and 4 are blank. The true boot2 code is written in blocks 1 and 2, but also there is a copy in blocks 6 and 7 although those blocks are reversed (block 1= block 7, block 2= block 6). Blocks 2, 4, and 6 have these block maps.
In the scenario where you DO have a vulnerable boot1, but you're wii have been updated by disc or official online update then you may have boot2 version 4 (aka boot2v4). If this is the case, when the update occurred it updated boot2 to version 4 and also deleted bootmii in boot2 as part of the process of the update. When you do have boot2v4 and you install bootmii into boot2 it will install into blocks 1 and 2. If this is your case then you will need to find a donor nand dump that does have boot2v4 with bootmii installed.
NOTE: You can not downgrade boot2 to a lower version, ever. It is programmed into the EEPROM as to what version should be currently installed. If the wii detects a lower version than what is listed in the EEPROM it will reject it and not continue booting the wii.
When boot1 executes, one of the things it does is check all of the block maps that are in boot2 and looks at the most recent version. When bootmii is installed into boot2, it's blockmap that it has written says that it is the most recent version. In the case of having boot2v2 or boot2v3 the bootmii blockmap also says that blocks 1 and 2 are bad blocks. Since boot1 thinks blocks 1 and 2 are bad blocks it skips them and runs blocks 3 and 4 instead where bootmii is installed. That is Nintendo's own security and safety checks being used against them. Absolutely hilarious.
Once bootmii blocks 3 and 4 are run it checks for additional files on the SD card. It has to do this because the full bootmii application is too big to be stored in just the boot2 of the nand. If those files are not present then it continues to boot the system as normal. In the case that the system menu or the SM IOS is screwed up (most common case a stubbed IOS60) then then only way to fix this is with running homebrew and correcting the issue.
Some people do not have bootmii installed to boot2 even if their boot1 is vulnerable (first time hacking it, newbies). If you have a wii that is bought before or around October of 2008 then your wii may have a vulnerable boot1. If you do not have bootmii installed to boot2 then you may be able to manually program it using an infectus or another flash memory programmer type hardware.
NOTE: If you are unsure of your boot2 version, you can use the infectus to do a full nand dump and then open up the dump in WiiNand v0.2. Click on the keys tab and you will see your boot1 version listed. Look carefully if you can't find it.Boot1a and boot1b are vulnerable and bootmii can be installed to boot2
[*]Methods of connecting the infectus to the wii's nand chip
NOTE: Many people have reported issues with trying to program a Samsung chip while it is still connected to the Wii Motherboard. Please expect that you will have to remove a Samsung NAND chip and program it externally if you want to program it.
There are quite a few method of doing this. I will mostly be explaining my solderless method in this post.
There are 3 other methods to do; Soldering directly to the vias, Soldering directly to the nand chip, and removing the nand chip from the wii's motherboard and programming it externally.
Here are the pro's and cons to each method;[*]
[*]Solderless
Pros;
If you get good at it then it can take you only an hour to connect and test.
You can still send it to Nintendo if this fails and blame it on a 4.2 update. It is best to erase all blocks of data if you are going to do this so they will never be able to detect homebrew and charge you for it.
Cons;
The wires are easily able to be popped out of the vias.
It requires that the wire you are using to be perfect size.
Highest possibility of data corruption
[*]Soldering to the Vias
Pros;
If you are good at soldering then this is more of a sure way of making a connection.
Less Likely that wires will just pop off of the vias
Cons;
Takes a lot of skill and patience
Requires special tools (a fine tip soldering iron and flux)
You need to tin the wires first.
Can take up to 2 hours to do depending on your skill level
[*]Soldering to the nand
Pros;
A lot more of a guarantee that your connection will have a better signal strength compared to the above listed methods.
Can overcome some data corruption issues.
Cons;
Requires a LOT of skills and previous experience with soldering.
Can take up to 3 hours to do.
If you had data corruption issues on the first 2 methods then this most likely wont fix it.
It is best to cut all wires to exact length, tin both ends and be very very careful.
[*]Removing the nand chip
There are actually 3 way of doing this. The first way is if you have a hot air station, and if you do then you should know enough to be able to remove your nand without needing my help.
The second way to do this is with ChipQuik. This is one of the best ways because it does very little thermal stress to the chip. Two issues with this is you have to then clean off all the ChipQuik solder from the NAND chip. and there is an easy chance of bending the pins or tearing off solder pads if you aren't careful.
The last way which is EXTREMELY dangerous to do and requires taking a needle prying up each pin of the nand chip while heating it up with a soldering iron.
Being that someone who has a hot air station should know enough, I will give the cons which mostly applies to the needle method and the pro's apply to all.
Pros;
Gives you the best chance of programming the nand without data corruption because you dont have to fight with the wii's signals.
Will most likely work when other methods have had data corruption issues while writing data.
Cons;
Take a lot of skill or the right tools.
You can f*ck up your wii beyond repairs.
You can break off pins from the nand chip.
You can rip of solder pads from the Wii's motherboard
Takes the most amount of time to do because not only do you have to remove the nand but you also have to solder to it too.
Takes even more time because after you are done programming the nand chip, you have to resolder it back onto the wii just to test it out and see if it works.
If programming fails and the wii doesn't start up after you solder the nand back on then you have to do it all over again and try to figure out what went wrong and hopefully it wasn't user error.
You EASILY waste a lot of time.
This is the hardest and most dangerous method to do.
The quickest that I have ever done this method through the full trip was about 8 hours. And that was with all of the preparation work, continuity testing one both when connecting the infectus to the nand chip and after resoldering the nand chip to the wii, testing for data corruption.
Now that I have a hot air station a repair can take me under an hour if everything goes perfect the first time around.
[*]Connecting the infectus to the wii by using my solderless method
Ok, so you understand and you have what is required (I am stopping the newbie info talk here and strictly talking only to people who can understand);
Assuming you have a clue of what you are doing. What you want to do is take that IDE ribbon cable and attach it to the infectus and to your wii. If you dont already have a clue and what you need to do then do some searching. There are 18 wires that need to be connected from the wii to the infectus. I used alligator clips for the Ground and the +5 volt connections (see the spoiler below for pics).
First thing to do is find a way of adhering the infectus onto the wii so if does not move around and disconnect things. Hot glue works, and also some double sided sticky tapes that have the foam layer in between to help raise it above the components. I also put electrical tape on the bottom side of the infectus to make sure that there are no shorts between the infectus and any component on the wii.
As far as the other 16 wires that handle write access and data transfer, those are the ones that you need the IDE ribbon cable for. You can take a razor blade and make a little cut in between the conductors so you can strip it apart and separate them.
You have 2 ways of doing this. you can take the IDE cable and separate it down to 2 strips of 8 wires or you can separate them down to individual wires. I like to make them stay connected for the columns of vias under Hollywood. ie. 0 and 1 being one connected strand. 2, 3 and 4 for the next. 5, 6 and 7, for the next. T, Q, P, and O for the next. Connections M, U, and N end up be separate single strands. P has 2 possible connections, but I prefer connecting it to where T, O, and Q are connected in row. I prefer this method because when all the wires are separated (Like the pic below) it can get a little messy and if one pops out the it is a pain in the ass to fix it and not pop out another one. When you have them connected as I described (I will get a pic up soon of it) then they kinda hold each other in place by adding a little tension. The vias are further apart than the wires of the ribbon cable.
Solder them onto the infectus. You will need to use your razor blade again so you can separate them far enough to get each wired to touch a solder pad. Dont go crazy with solder and try to use some extra flux if you have it.
2 great things about the IDE ribbon cable: The are easy to strip with just your finger nail, and they PERFECTLY fit into the vias that are under the Hollywood processor (your experience may vary. Sucks to be you if it does). Find a different cable if you need to. If you dont know what "vias" are, they are the little holes coated with metal that connect different conductive layers of the PCB (circuit board).
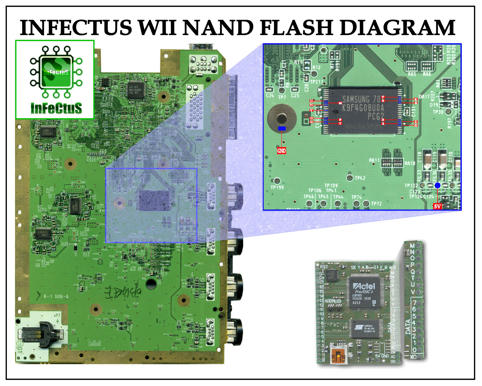
Here are some pics.
The actual Infectus Nand Flash Diagram.
[www.mediafire.com]
This is the infectus map for earlier Wii's (has vulnerable boot1) (provided by evans112682)
[www.mediafire.com]
This is the Infectus map for revision 40 Wii Motherboards (does not have a vulnerable boot1) (provided by evans112682)
[www.mediafire.com]
Here's what it looks like with the wires connected.
[www.mediafire.com]
If you do it right you can slide all the wires into each via perfectly without needing to solder anything to the wii. As far as the ground and 5+ volt connections, as I mentioned, I used alligator clips for them. I found some copper ones at radio shack that did not have teeth on them. I was able to bend the tip for the ground one and and just connect it to the screw hole of the Wii's PCB mother board.
If you look at the pics in the spoiler below and the the infectus nand flash diagram pic above, and you can see where you are to connect the 5+ volt lead, well I use an alligator clip and clipped it on the SMD component labeled FIL34. You dont need to worry about bridging the 2 ends of that component, it wont hurt anything if it does. It is better to have 2 ground connections going to the Wii to help prevent data corruption, see the 3rd pic down in the spoiler below.
[spoiler]
[www.mediafire.com]
[www.mediafire.com]
[www.mediafire.com]
[www.mediafire.com]
[/spoiler]
You should solder in a momentary switch with one end connected to the ground the other end connected to the Data 0 lead, both you can do directly on the infectus. You need to do this so you can press the button and short out Data 0 to the ground for when you turn on the wii, this will cause Hollywood to halt operations. Otherwise Hollywood will do activity with the nand about once a minute, even if the wii is bricked. If you do not short Data 0 to ground and you're trying to read or write data then it could become corrupted because of Hollywood's activity.
You MUST use your multimeter and do a continuity test to make sure that there is continuity from the pins of the nand chip all the way to the solder pads on the infectus chip. If continuity fails then you much recheck all connections.
This method is fairly safe from nintendo ever noticing that you did anything hardware wise to the wii in case the end result is that you got to send it to nintendo.
[*]Connecting the infectus to your PC and powering your Wii;
NOTE: Doing this with the method of having the infectus attached to your wii REQUIRES that your Wii be turned on in this process. Please leave the heatsink and thermal pads touching the CPU and GPU of the Wii while the Wii is powered on (green light at power button). Also, use a small fan to blow across the heatsink to make sure it does not overheat and cause the Wii to shut down during programming. I use a small computer fan.
Before the XavBox software will work with the infectus and find your nand chip everything will need to be powered up in the right order. You should already have the Infectus attached to your Wii. You will need to start without the Wii plugged into the power brick and without the Infectus's USB cable plugged into your PC.[*]Press and hold the momentary switch that you installed onto the infectus so you can short data 0 to ground.
[*]Plug in the power cable into your Wii.
[*]Press the power button so the LED becomes green (When you first plugged in the power cord the Wii may have automatically powered up with a green LED)
[*]1 second or so after powering up your Wii, release the momentary switch
[*]Now plug in the USB cable for the Infectus into your PC.
NOTE: If when running the XavBox software in the later step, if you have issues detecting the NAND chip or "Error during infectus reset" message then you may need to try the above steps over again. You can also try not pressing the momentary switch at all and see if that help for the software to be able to run the Infectus and identify the NAND. If you do try the above steps again then you will need to unplug the USB cable and the power from the Wii and start the steps over again.
[*]Now about the Xavbox Software;
I personally prefer to use this software instead of the actual infectus software or even Bushing's Amoxiflash software. Xavbox was actually based off of Bushing's reverse engineering of the USB protocol to run the infectus. I actually recommend that you never run the infectus software with the infectus attached to your wii because the newest version apparently updates the code on the infectus and can cause some issues according to what Bushing has said.
To use Xavbox with your infectus, you have to install the infectus drivers that are included with the Xavbox download.
Lets take a look at the screenshot of the Xavbox software and I'll explain the features.
We are only going to be working on the first tab labeled "Infectus". Here is a list of the buttons and the functions of things.
Detect USB -When you click on this the software will try to connect with the infectus. If it is successful then the little bullet next to the button will become marked. If it does not then you need to check your wiring and make sure that you have the correct drivers installed.
Open -This button will perform a reset to the infectus. If it performs this action correctly then the box next to the "Open" button will say "Infectus reset done". If it fails this action it will say "Error during infectus reset".
Ident -This will try to identify the flash memory that the infectus is connected to. If it does this correctly then It will display the information about the flash memory chip in the box next to that button and it will fill in all the dropdown windows that are labeled "Blocks", "Pages", "Bytes", and "Spare" with the correct information about your flash chip.
Status -When you click the status button it will check the status of the flash chip and return it to the "Results" box. I have seen it return things like C0 and D0, both were basically saying that the flash memory is in control by the infectus and the flash memory is in a programmable state.
Source -Clicking on this will allow you to open a file that will be written to the flash memory. This file does not need to be a full nand dump and it does not matter if your keys are written at the end of the file like what happens with a bootmii nand backup.
Destination -This will let you specify a file to create for when you "Read" the data from the nand.
Read -What this does is it will read the data from the flash memory and output it into the file specified in the "Destination" field.
Compare Data -This will compare the data in the flash memory against the file specified in the "Source" field. If a block is different at all then it will say it in the "Results" box. Example "Block 420 is different".
Erase -This will erase the data in the blocks. This is a very quick process.
Erase Verify -This function will get to make sure that those blocks actually did erase and that there wasn't any issues. If you ever get a block that fails to erase then it could be a bad block or your wiring might be the best.
Parameters -This section affects all four functions of "Read", "Compare Data", "Erase", "Erase Verify", and also the "Write" button. You can specify a block range to work with so you dont have to perform any function to the whole nand if not needed since it can take a long time to do.
First Bloc -This is the starting point of what blocks to work with.
Last Bloc -This specifies the end of the range of blocks to work with.
Check ECC -When this is checked it will check the ECC data of something...I'm not sure whether it's reading or writing that this affects because I have not fully experimented with it yet.
Relative -This is used when you have a source file that is not a full nand dump.
For example, if you have a file that has only blocks 3 and 4 (the bootmii blocks) and does not contain any other data from any other blocks and you want to write that to blocks 3 and 4 on the nand, the you specify 3 in the "First Bloc" field and 4 in the "Last Bloc" field and then check off the "Relative" check box so the software knows that the file is relative to the blocks that you are trying to work with. In the same example, if you did not have the Relative checkbox checked and you tried writing the file to blocks 3 and 4 the program would error out saying that the "File is too small" or something like that.
Write (The section of the program, not the actually button) -This area of the program controls how the data is written.
Write (The actual button this time) -This will write data to the blocks specified in the "First Bloc" to "Last Block" field. It will write the data differently depending on which bullet is marked. Read more and you'll understand.
All Without Compare -When this is marked the program will just write the data to the blocks and nothing else.
All With Compare -When this is marked the program will write the data and then it will read the block from the flash memory and compare it to the data in the source file to make sure it wrote the data successfully.
Update Without Compare -I have not played too much with this yet, but I'm pretty sure I know exactly how it works. I think that when this is marked and you click "Write", I think the software will first read the block from the nand and compares it to the data in the file, if the data is different then it will write the block of data. If the data is the same then it skips writing to that block.
Update With Compare -As with the above function, I have not fully tested it, but it works the same as the as the "Update Without Compare" function, but also adds in the compare function (hence the Update With Compare). So after it updates a block it will read it again to ensure it wrote the data correctly.
Now I do have to say, I have found a bug with the compare functions of the software. If the software detects a block is different then sometimes it will list the remaining blocks that it has to compare as all being different when in fact they are not. It's a bug that I hope gets fixed soon. If you keep you're eye on it while it is doing a compare and you "Stop" it right as it bugs out, take note of the block that it first found was different. Then go and change your starting position ("First Bloc") to the block after the block that it bugged out on and start the compare again. This will mostly pertain to the next section or if you are writing a full nand dump to your wii.
[*]Preparing to fix the wii.
So now you have a good amount of info here to be able to help you out and understand what is going on in the back ground. If you have not read or understood everything or are stuck then don't try going forward with this.
WARNING: When writing data, it can go completely wrong and you lose everything and sometimes might have to fully removed the nand chip from the pcb to be able to program it. I do not take any blame if you f*ck something up worse than what it already was. If you bricked it in the first place then you might not be smart enough to pull off something like this anyways.
First things first. Do a FULL nand dump using the infectus (blocks 0-4095). Save it in a great place and even make copies of it first it you need to hex edit it for any reason because some hex editors will change the data in the file right away even without having pressed the "save" button first.
If you have an older wii that has a vulnerable boot1, but you do not have bootmii installed to boot2 then you need to find a nand dump that does have bootmii installed to boot2. Don't ask me for the files or anything. I have already asked permission to post up bootmii blocks 3 and 4 and I was denied that permission.
Before writing any data to any part of the nand especially boot1/2 area of the nand, we need to test out a few things first and make sure that it goes according to plans. I suggest doing this first so you be sure that your data will write properly. These are the steps that I have tried;[*]Specify a destination file and specify to do blocks 4080-4095, then "Read" those block to dump them into that file. (Check "Relative" while you are at it.)
[*]Specify that file that was just created as being the Source file.
[*]Perform a "Compare". If it does not say that any blocks were different then go onto the next step. If blocks are different then make sure the "Relative" box is checked and double check EVERYTHING before going on further. If you can't ever get this step correct then stop there.
[*]Open that file that you just created with a hex editor (I prefer Hex Workshop v6). Check to see if there was ever any real data in that file or if those were all just blank blocks. If they were all just blank block then you will need to try a different block range (like 1000-1015) until you find a section that does have real data in it.
[*]Now, Erase those blocks and do an Erase Verify afterwards. If the program responds that a block was not erased then it might be a bad block or one of the connections could be bad.
[*]Now write back those block to your nand, and then afterwards do a Compare. If the compare does not say that any blocks were different then you are most likely good to go.
[*]Now lets get bootmii installed
I am going to give an example of if you're just going to write blocks 3 and 4 to install bootmii into boot2v2 or boot2v3. If you are going to write a full nand backup then adjust the steps to be for a full restore. If people get stuck figuring this out then I will do a full write up on it later.
So now you've got your infectus hooked up, you tested everything out to make sure that you can write data correctly and you have a nand dump that has bootmii installed to boot2. So here we go. (You did do a full dump with the infectus first...right?)[*]Specify for the program to work with block range 3 to 4. (Make sure relative is unchecked if you have a full nand dump)
[*]Erase and erase verify those blocks.
[*]Specify the nand dump that has bootmii installed as boot2 as being the Source file
[*]Write those blocks 3 and 4.
[*]Perform a compare to make sure that the data was written correctly.
[*]Put your sd card that has the bootmii files on it in your wii. Unplug the USB cable from your computer.
[*]Power off your wii, and then power it back on and see if bootmii comes up. If it does then see if you can launch the HBC and if you can then you are golden.
I will not bother to go into steps beyond that because your brick might be different than what I specify. Open up a new thread and ask for help as to what to do from there.
[*]Troubleshooting
I have noticed that when doing the method of halting Hollywood by shorting Data 0 to ground, and then you start up the infectus and try to "Detect USB", "Open", then "Ident", you will get an error that the software can't identify the nand. If this is happeneing to you then try this. Try starting up the wii and NOT shorting Data 0 to ground, then follow the normal step. If it does propperly identify the nand that time then what needs to be done is;
Load the actual infectus drivers that come with the infectus software (If you dont know how to do this then google info about specifying a driver to install). Then run the actual infectus software. You may need to close and open the Infectus software 3 or 4 times for it to finally recognize it. If it does then load up the Xavbox infectus drivers and run Xavbox again and it should work. Do this without unplugging the USB or turning off power at all between steps.
[*]Links
Here are some links to other threads or pages that anyone who wants to perform this stuff should read also to fully understand even more of what is going on.
Betwiin v.10, Betwiin is a tool that will let you convert NAND dumps
Data corruption during Wii dumps, solved If you read the first post it explains "Ground bounce" and also about shorting Data 0 ("D0") to ground to halt Hollywood. Thank you, yet again to Bushing for being a genius.
Wii Brick Fixing. Determining the issue and fixing it tutorial. To help people who dont know how their wii broke.
[*]Why the f*ck am I wasting my time to write this up?
Well, hopefully I have not wasted my time. Hopefully this will help many people and cut down on the number of new threads being created. I want to help people how ever I can. And I certainly hate seeing the same question asked again and again. If anyone ever asks a question that has been answered in this thread then I reserve all right to ignore that person or only post a link to the post with the answer.
[*]Thank You
I would like to say thank you to Team Twiizer specifically Marcan and Bushing for putting up with me asking a million questions, HiBit for his research, effort and being a guinea pig for trying this type of stuff out, Bronx for writing XavBox, XFlak for the random help, GiantPune for all his knowledge. If I forgot anyone I will be glad to add them in.
[*]Additional Pictures
In the spoiler below you will find a few of my images taken from previous repairs using the solderless method.
[spoiler]
[www.mediafire.com]
[/spoiler]


Sorry, only registered users may post in this forum.